2022年7月31日日曜日

H.264はサイズがデカすぎる...H.265にエンコードして、コンパクト&スマートに!!

こんにちは。よっしーです。

リモートワーク化が進み、Web会議を行う機会が増えました。

議事録として、また不参加者への共有手段として、

Web会議そのものを録画して残す。というやり方も多くなったのではないでしょうか?


録画自体はWindowsPCであれば「ゲームバー」で行うことが出来るのですが、

録画したデータはmp4(H.264形式)でかなり容量が大きく、

動画ファイルを残しておくと考えると、かなりのストレージ容量が必要になります。


今回はH.265形式に圧縮して動画ファイルサイズを抑える方法について

手順などを記載したいと思います。


まず、エンコードソフトをインストールします。

XMedia Recode


起動すると以下のような画面になります。

「ファイルを開く」から圧縮する動画ファイルを選択し、形式を「MP4」に設定します。


次は「映像タブ」を選択し、コーデックに「H.265」を設定します。

※画質等はお好みで設定してみて下さい。


あとは「リストに追加」を選択し「エンコード」を実行するだけです。


エンコードが完了し、出力されたH.265の動画ファイルが以下です。


変換前のH.264形式のファイルが1GB超に対し、

変換後のH.265形式のファイルが45MBにまで小さくなっています。


これならストレージ容量の節約にも活かせますね!

リモートで動画ファイルのやり取りをするのも、

データサイズが小さければダウンロード時間やパケットの節約にもつながります。

動画ファイルがデカすぎる!とお困りの方は、

一度、H.265での圧縮を試してみてはいかがでしょうか。

ではまた~。

2022年7月24日日曜日

XAMLのお勉強メモ ⑥

こんばんは。ざわです。
今回もタイトル通り、XAMLネタです。
過去履歴はこちら。


動作環境

 ・Windows10

 ・Microsoft Visual Studio Community 2022 Preview 7.0

 ・Xamarin.Forms

今回試してみたこと


 本日は「ResourceDictionary」について書いてみようと思います。
 コントロールには色やサイズ、フォント等々の属性を設定しますが
 コントロール毎に設定するのは手間がかかりますし、
 変更したい場合、各コントロールに同じような変更を反映していくのはやってられないので
 Styleを定義してそちらを使うことにします。

 まず、コンテンツページにラベル、テキストボックス、ボタンを配置し
 属性を設定して見た目を整えます。

 「ResourceDictionary」を使う前のソースはこれです。

<StackLayout BackgroundColor="#1976d2">
    <Label Text="氏名" TextColor="White" FontSize="16" Margin="30, 30, 30, 10" />
    <Entry Placeholder="神戸 太郎" x:Name="txtName"
            FontSize="16" HeightRequest="40" Margin="30, 0, 30, 0" />

    <Label Text="フリガナ" TextColor="White" FontSize="16" Margin="30, 30, 30, 10" />
    <Entry Placeholder="コウベ タロウ" x:Name="txtKana"
            FontSize="16" HeightRequest="40" Margin="30, 0, 30, 0"/>

    <Label Text="住所" TextColor="White" FontSize="16" Margin="30, 30, 30, 10" />
    <Entry Placeholder="兵庫県神戸市" x:Name="txtAddress"
            FontSize="16" HeightRequest="40" Margin="30, 0, 30, 0"/>

    <StackLayout Orientation="Horizontal" HorizontalOptions="Center" Margin="0,60">
        <Button Text="登録" x:Name="btnRegist"
                BackgroundColor="#bdbdbd" TextColor="Black" Margin="30, 0, 30, 0"/>
        <Button Text="キャンセル" x:Name="btnCancel"
                BackgroundColor="#bdbdbd" TextColor="Black" Margin="30, 0, 30, 0"/>
    </StackLayout>
</StackLayout>

 1. 「ResourceDictionary」で属性設定

以下のように編集します。 

① <ContentPage.Resources>~</ContentPage.Resources>の箇所を追加
・Style要素の x:Key 属性には一意の文字列キー、
 TargetType 属性にはコントロールの種類を定義します。
<Style x:Key="labelStyle" TargetType="Label">

・Setter要素に設定したい属性とその値を設定します。
<Setter Property="TextColor" Value="White" />
 
② 各コントロールの FontSize等の属性を削除し、代わりに Style属性を追加し
 以下の赤字部分のように①でKey属性に定義した文字列キーを設定します。
<Label Text="氏名" Style="{StaticResource labelStyle}" /> 
 
<ContentPage.Resources>
    <ResourceDictionary>
        <Color x:Key="PageBackgroundColor">#1976d2</Color>
        <Style x:Key="labelStyle" TargetType="Label">
            <Setter Property="TextColor" Value="White" />
            <Setter Property="FontSize" Value="16" />
            <Setter Property="Margin" Value="30, 30, 30, 10" />
        </Style>
        <Style x:Key="entryStyle" TargetType="Entry">
            <Setter Property="FontSize" Value="16" />
            <Setter Property="HeightRequest" Value="40" />
            <Setter Property="Margin" Value="30, 0, 30, 0" />
        </Style>
        <Style x:Key="buttonStyle" TargetType="Button">
            <Setter Property="BackgroundColor" Value="#bdbdbd" />
            <Setter Property="TextColor" Value="Black" />
            <Setter Property="Margin" Value="30, 0, 30, 0" />
        </Style>
    </ResourceDictionary>
</ContentPage.Resources>

<StackLayout BackgroundColor="{StaticResource PageBackgroundColor}">
    <Label Text="氏名" Style="{StaticResource labelStyle}" />
    <Entry Placeholder="神戸 太郎" x:Name="txtName" Style="{StaticResource entryStyle}" />

    <Label Text="フリガナ" Style="{StaticResource labelStyle}" />
    <Entry Placeholder="コウベ タロウ" x:Name="txtKana" Style="{StaticResource entryStyle}" />

    <Label Text="住所" Style="{StaticResource labelStyle}" />
    <Entry Placeholder="兵庫県神戸市" x:Name="txtAddress" Style="{StaticResource entryStyle}" />

    <StackLayout Orientation="Horizontal" HorizontalOptions="Center" Margin="0,60">
        <Button Text="登録" x:Name="btnRegist" Style="{StaticResource buttonStyle}" />
        <Button Text="キャンセル" x:Name="btnCancel" Style="{StaticResource buttonStyle}" />
    </StackLayout>
</StackLayout>

編集後の実行結果も「ResourceDictionary」を使う前と同じになります。

このサンプルはページレベル(ContentPage.Resources)ですが、 
アプリケーションレベルで設定する場合は App.xaml の <Application.Resources>内に
上記サンプルの<ResourceDictionary>~</ResourceDictionary> の部分と同じように設定すればOKです。
(Application.Resources と ContentPage.Resources に同じキーが設定されている場合は、ContentPage.Resources のほうが有効)

 2. 暗黙的スタイルを使った場合

上記サンプルはStyle宣言時に「x:Key」属性を明示的に定義していますが、
「x:Key」属性を定義せずに暗黙的に設定することも可能です。
その場合は「TargetType」属性に指定したコントロールに対してスタイルが適用されます。
試しに、ボタン コントロールの設定を暗黙的な設定のほうに変更してみます。
コメントのほうが明示的、コメントなしのほうが暗黙的。
(ついでにボタンの色をグレーからピンクに変更しています) 
 
<!--<Style x:Key="buttonStyle" TargetType="Button">
    <Setter Property="BackgroundColor" Value="#bdbdbd" />
    <Setter Property="TextColor" Value="Black" />
    <Setter Property="Margin" Value="30, 0, 30, 0" />
</Style>-->
<Style TargetType="Button">
    <Setter Property="BackgroundColor" Value="#ea80fc" />
    <Setter Property="TextColor" Value="Black" />
    <Setter Property="Margin" Value="30, 0, 30, 0" />
</Style>

<StackLayout Orientation="Horizontal" HorizontalOptions="Center" Margin="0,60">
    <!--<Button Text="登録" x:Name="btnRegist" Style="{StaticResource buttonStyle}" />
    <Button Text="キャンセル" x:Name="btnCancel" Style="{StaticResource buttonStyle}" />-->
    <Button Text="登録" x:Name="btnRegist" />
    <Button Text="キャンセル" x:Name="btnCancel" />
</StackLayout>

(実行結果)


 3. ResourceDictionaryファイルを使った場合

上記のようにページに<ContentPage.Resources> や <Application.Resources> を定義する方法ではなく、ResourceDictionaryファイルを使うこともできるようです。

設定の流れは、

1. プロジェクトに[追加]→[新しい項目]でコンテンツページを追加
ファイル名:MyResourceDictionary.xaml 
2. MyResourceDictionaryのコードビハインドファイル(MyResourceDictionary.xaml.cs)を削除
3. xamlファイルでベース・クラスの名前を ContentPage から ResourceDictionary に変更(下記サンプルの赤字箇所)
4. xamlファイルのルートタグから x:Class 属性を削除 (下記サンプルの赤字箇所)
  不要な<ContentPage.Content>~</ContentPage.Content>の部分も削除
5. 下記サンプルの変更後のように、Styleの設定を追加

■MyResourceDictionary.xaml : 変更前 

<?xml version="1.0" encoding="utf-8" ?>
<ContentPage xmlns="http://xamarin.com/schemas/2014/forms"
             xmlns:x="http://schemas.microsoft.com/winfx/2009/xaml"
             x:Class="App6.MyResourceDictionary">
    <ContentPage.Content>
        <StackLayout>
            <Label Text="Welcome to Xamarin.Forms!"
                VerticalOptions="CenterAndExpand"
                HorizontalOptions="CenterAndExpand" />
        </StackLayout>
    </ContentPage.Content>
</ContentPage>

 ■MyResourceDictionary.xaml : 変更後

<?xml version="1.0" encoding="utf-8" ?>
<ResourceDictionary xmlns="http://xamarin.com/schemas/2014/forms"
             xmlns:x="http://schemas.microsoft.com/winfx/2009/xaml">
   
    <Color x:Key="PageBackgroundColor">GreenYellow</Color>
    <Style x:Key="labelStyle" TargetType="Label">
        <Setter Property="TextColor" Value="Black" />
        <Setter Property="FontSize" Value="16" />
        <Setter Property="Margin" Value="30, 30, 30, 10" />
    </Style>
    <Style x:Key="entryStyle" TargetType="Entry">
        <Setter Property="FontSize" Value="16" />
        <Setter Property="HeightRequest" Value="40" />
        <Setter Property="Margin" Value="30, 0, 30, 0" />
    </Style>
    <Style x:Key="buttonStyle" TargetType="Button">
        <Setter Property="BackgroundColor" Value="#bdbdbd" />
        <Setter Property="TextColor" Value="Black" />
        <Setter Property="Margin" Value="30, 0, 30, 0" />
    </Style>
   
</ResourceDictionary>


6.入力項目やボタン等を配置したほうのコンテンツページにResourceDictionaryファイルの定義を追加(下記サンプルの赤字箇所)
<ContentPage.Resources>
    <ResourceDictionary Source="MyResourceDictionary.xaml" />
</ContentPage.Resources>
 
<StackLayout BackgroundColor="{StaticResource PageBackgroundColor}">
    <Label Text="氏名" Style="{StaticResource labelStyle}" />
    <Entry Placeholder="神戸 太郎" x:Name="txtName" Style="{StaticResource entryStyle}" />
 
    <Label Text="フリガナ" Style="{StaticResource labelStyle}" />
    <Entry Placeholder="コウベ タロウ" x:Name="txtKana" Style="{StaticResource entryStyle}" />
 
    <Label Text="住所" Style="{StaticResource labelStyle}" />
    <Entry Placeholder="兵庫県神戸市" x:Name="txtAddress" Style="{StaticResource entryStyle}" />
 
    <StackLayout Orientation="Horizontal" HorizontalOptions="Center" Margin="0,60">
        <Button Text="登録" x:Name="btnRegist" Style="{StaticResource buttonStyle}" />
        <Button Text="キャンセル" x:Name="btnCancel" Style="{StaticResource buttonStyle}" />
    </StackLayout>
</StackLayout>

 (実行結果 : 違いが分かるようにページの背景色を黄緑色に変更しています)


今回は StaticResource の方法でいくつか試してみましたが、動的なDynamicResource を使う方法などもあるようですね。
今日はこれにて。それではまた。 


2022年7月15日金曜日

ExcelDataReaderでExcelを高速に読み込む

どうも。ひっくです。

今回は表題の通り、ExcelDataReaderを使用してExcelデータを高速に読み取る方法について

備忘録として残しておこうと思います。

ExcelDataReaderの使用用途、メリット・デメリット


  • 使用用途

    Excel管理しているデータをDBへ保存する。

    Excel管理しているデータを読み込み、集計・分析等別途処理を行う前提データとして活用する。etc.


  • メリット

    • 読み込み処理時間がかなり早い

      他Excel読み込みライブラリと比較した結果は色々検証されている方がいるようなので

      そちらを参照していただければと思いますが、読み込みは一番早い処理速度となっていました。

    • 旧形式エクセルファイル(.xls)、新形式エクセルファイル(.xlsx)の両形式が読み取り可能

      他Excel読み込みライブラリでは旧型式エクセルファイルをサポートしていないこともありますが、

      特に事前の設定等必要なく、読み込み対象としてサポートされています。

    • Officeがインストールされていない環境でも使用可能

    • MITライセンスで商用利用可能

  • デメリット

    • 読み込み処理しかできない

      書き込み処理はサポートされていません。書き込みは別ライブラリを使用する必要があります。

    • 罫線情報やセル参照の名前定義等は読み込まれない情報がある。

      Microsoft.Office.Interop.Excel(Com参照)等で取得可能な情報は、あまり取得できないようです。


動作環境と公式GitHubについて


実際に使用してみる


今回確認は以下で実施しています。

OS: Windows11

Target Framework: .NetCore3.1

VisualStudio: 2022 Community


導入手順は以下の通りです。

  1. NuGetから「ExcelDataReader」「ExcelDataReader.DataSet」をインストールします。

  2. ExcelDataReaderを参照し、読み込み用メソッドを用意しておきます。

    以下サンプルを使用してExcelファイルを読み込むと、DataTable型でExcelのデータを取得することができます。

using ExcelDataReader;
using System;
using System.Data;
using System.IO;
using System.Text;

namespace ExcelDataReaderTest
{
    public class ExcelCsvDataReader
    {
        public DataTable ReadExcelData(string path, string sheetName = null, string passsword = null)
        {
            DataTable data = null;

            try
            {
                // .NetCoreの場合、Encodingが足りないので以下1行が必要になる(.NETFrameworkでは不要)
                Encoding.RegisterProvider(CodePagesEncodingProvider.Instance);
                using var stream = File.Open(path, FileMode.Open, FileAccess.Read);
                var excelReaderConfig = new ExcelReaderConfiguration();
                if (passsword != null)
                {
                    excelReaderConfig.Password = passsword;
                }

                using var reader = ExcelReaderFactory.CreateReader(stream, excelReaderConfig);
                DataSet ds = reader.AsDataSet();
                data = string.IsNullOrEmpty(sheetName) ? ds.Tables[0] : ds.Tables[sheetName];
            }
            catch (Exception)
            {
                throw;
            }

            return data;
        }
    }
}


変数「ds」をビジュアライザーで開いたのが以下になります。

各シートがそれぞれ読み込まれているのが分かりますね。

「各歳別人口1」シートの取得結果は以下になります。

見ていただければ分かりますが、A列から順に「Column0」を起点として自動的に列名が割り振られます。

このとき、データへアクセスするために列名を列Indexに変換するような処理が必要になってきます。

以下のようなメソッド「列名⇒列Index変換」「列番号⇒列名変換」等を適宜作成の上、読み込む列名・列番号を

変換して使用すれば良いかと思われます。(実装内容についても必要に応じ、適宜変更してください)

        private string alphabet = "ABCDEFGHIJKLMNOPQRSTUVWXYZ";
        public string NumberToColumnName(int columnNumber)
        {
            var sb = new StringBuilder();
            for (; 0 < columnNumber; columnNumber = (columnNumber - 1) / 26)
            {
                int n = (columnNumber - 1) % 26;
                sb.Append(alphabet.Substring(n, 1));
            }

            return sb.ToString();
        }
        
        public int ColumnNameToColumnIndex(string columnName)
        {
            int number = 0;

            if (!Regex.IsMatch(columnName.ToUpper(), @"^[A-Z]+$"))
            {
                throw new FormatException("引数はアルファベットのみを指定してください");
            }

            for (int i = 0; i < columnName.Length; i++)
            {
                int n = alphabet.IndexOf(columnName.Substring(i, 1)) + 1;
                number += n * (int)Math.Pow(26, columnName.Length - i - 1);
            }

            return number - 1;
        }


ExcelDataReader導入時の注意点


上記サンプルコードのコメントにも付記していますが、.NetCoreをTarget Frameworkに指定している場合

NuGetで「System.Text.Encoding.CodePages」をインストール(※)の上、以下の行を追加しないと例外が発生します。

例外発生時のメッセージは以下の通りです。

「System.NotSupportedException: 'No data is available for encoding 1252. For information on defining a custom encoding, see the documentation for the Encoding.RegisterProvider method.'」


※ NuGetで「System.Text.Encoding.CodePages」をインストール


まとめ


以上、ExcelDataReaderを使用して高速にExcelを読み込む方法について、まとめました。

高速にExcelを読み込みたい場合、読み込み処理のみが必要な場合等は、このライブラリを使用すれば良いのではないでしょうか。

なお、CSVファイルについても同様に読み込みが可能だったりします。

次回はCSVファイルの読み込み方法についても紹介します。


今回はこのへんで。ではまた!

2022年7月1日金曜日

PHP + WSL2 + docker on Windows環境構築

どうも、もりもりです。

今回はPHPを初めて触る機会があったので自分用に環境構築メモ。
Windowsでの実施となりますが、ローカル環境をあまり汚したくないので 「WSL2 + Docker」上で動かしてvscodeからリモート接続し、「Hello World」を表示するところまでやってみました。

1. Install WSL

■ 管理者でPowerShellを起動

  1. win + R
  2. 「powershell」と入力
  3. Ctrl + Shiftを押しながらOK

■ インストール可能なディストリビューションを確認

> wsl --list --online
インストールできる有効なディストリビューションの一覧を次に示します。
既定の分布は ' * ' で表されます。
    'wsl --install -d <Distro>'を使用してインストールします。

  NAME            FRIENDLY NAME
* Ubuntu          Ubuntu
  Debian          Debian GNU/Linux
  kali-linux      Kali Linux Rolling
  openSUSE-42     openSUSE Leap 42
  SLES-12         SUSE Linux Enterprise Server v12
  Ubuntu-16.04    Ubuntu 16.04 LTS
  Ubuntu-18.04    Ubuntu 18.04 LTS
  Ubuntu-20.04    Ubuntu 20.04 LTS

■ インストール

下記コマンドにてディストリビューションを指定してインストール

> wsl --install -d <Distribution Name>

今回は「Ubuntu-20.04」を指定

> wsl --install -d Ubuntu-20.04
インストール中: 仮想マシン プラットフォーム
仮想マシン プラットフォーム はインストールされました。
インストール中: Linux 用 Windows サブシステム
Linux 用 Windows サブシステム はインストールされました。
ダウンロード中: WSL カーネル
インストール中: WSL カーネル
WSL カーネル はインストールされました。
ダウンロード中: Ubuntu 20.04 LTS
要求された操作は正常に終了しました。変更を有効にするには、システムを再起動する必要があります。

完了したらPCを再起動

■ バージョン確認

> wsl -l -v
  NAME            STATE           VERSION
* Ubuntu-20.04    Stopped         2

■ 既定のディストリビューションを設定

既定のディストリビューションを設定したい場合は下記コマンドを実行

> wsl --set-default Ubuntu-20.04

■ 起動&ユーザー登録

IDとパスワードを登録

Installing, this may take a few minutes...
Please create a default UNIX user account. The username does not need to match your Windows username.
For more information visit: https://aka.ms/wslusers
Enter new UNIX username: dev
New password:
Retype new password:
passwd: password updated successfully
Installation successful!
To run a command as administrator (user "root"), use "sudo <command>".
See "man sudo_root" for details.

Welcome to Ubuntu 20.04 LTS (GNU/Linux 5.10.16.3-microsoft-standard-WSL2 x86_64)

    * Documentation:  https://help.ubuntu.com
    * Management:     https://landscape.canonical.com
    * Support:        https://ubuntu.com/advantage

    System information as of Tue Jun 28 10:42:35 JST 2022

    System load:  0.0                Processes:             8
    Usage of /:   0.4% of 250.98GB   Users logged in:       0
    Memory usage: 0%                 IPv4 address for eth0: 172.20.163.190
    Swap usage:   0%

0 updates can be installed immediately.
0 of these updates are security updates.


The list of available updates is more than a week old.
To check for new updates run: sudo apt update


This message is shown once once a day. To disable it please create the
/home/dev/.hushlogin file.

■ パッケージ更新&アップグレード

$ sudo apt update && sudo apt upgrade

2. Install Docker

■ ダウンロード

Docker Desktopをダウンロード
※2022/06/28 時点 : Version 4.9.1

■ インストール

インストーラを実行

■ 設定の変更

下記のトグルをONに変更

3. Ubuntu上に作業場所を作成

■ vscodeから作成したディレクトリに入る

下記を選択

「New ESL Window using Distro...」を選択

「Ubuntu-20.04」を選択

■ Ubuntu上に作業ディレクトリを作成

$ cd ~
$ mkdir -p work/php-test

■ vscodeで開く

作成した作業ディレクトリを選択してOK

4. PHPでHello World

■ DockerファイルやPHPファイルを作成

作業ディレクトリに下記の構成でファイルを作成

work
└── php-test
    ├── .devcontainer
    │   └── devcontainer.json
    ├── Dockerfile
    ├── docker-compose.yml
    └── src
        └── index.php

■ devcontainer.json

コンテナ内でもファイルをvscodeで開けるよう設定ファイルを作成

{
    "name": "php8.1",
    "dockerComposeFile": [
        "../docker-compose.yml"
    ],
    "service": "php",
    "workspaceFolder": "/var/www/html",
    "settings": {
        // "editor.fontSize": 32
    },
    "extensions": [
        "xdebug.php-pack"
    ]
}

extensions : ローカルの拡張機能が使用できないため、使用したい拡張機能があれば指定。指定するIDは下記の「Copy Extension ID」でコピーした値。

■ Dockerfile

FROM php:8.1-apache

■ docker-compose.yml

version: '3'

services:
    php:
    container_name: php8.1-test
    build: .
    ports:
        - 8080:80
    volumes:
        - ./src:/var/www/html

■ index.php

<?php echo "Hello World!"; ?>

5. vscodeでコンテナの作業フォルダを再開

■ Reopen in Container

■ PHPのバージョン確認

# php -v 
PHP 8.1.7 (cli) (built: Jun 23 2022 07:54:35) (NTS)
Copyright (c) The PHP Group
Zend Engine v4.1.7, Copyright (c) Zend Technologies

■ Hello World を表示

http://localhost:8080/ にアクセス

■ vscodeの拡張機能を確認

■ docker周辺の設定を変更した際は再ビルド

$ docker-compose build --no-cache
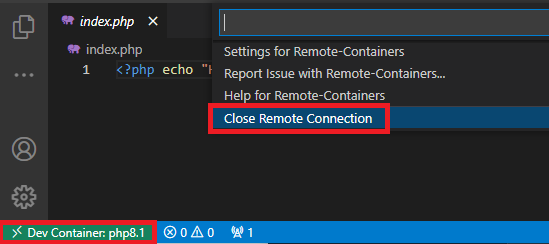
6. リモート接続終了

7. コンテナ内のWorkspaceを変更

作業ディレクトリに下記の構成でファイルを作成

work
└── php-test2
    ├── .devcontainer
    │   └── devcontainer.json
    ├── Dockerfile
    ├── docker-compose.yml
    └── src
        └── index.php

「3. Ubuntu上に作業場所を作成」で作成したディレクトリをコピーでOK

$ cp -r php-test/ php-test2

■ devcontainer.json

{
    "name": "php8.1-2",
    "dockerComposeFile": [
        "../docker-compose.yml"
    ],
    "service": "php",
    "workspaceFolder": "/work/php/test2",
    "settings": {
    },
    "extensions": [
        "bmewburn.vscode-intelephense-client",
        "xdebug.php-debug",
        "formulahendry.code-runner"
    ]
}

■ Dockerfile

FROM php:8.1-apache

ARG project_dir=/work/php/test2

# なければ新規作成
WORKDIR $project_dir

CMD [ "php", "-S", "0.0.0.0:8000", "-t", "/work/php/test2" ]

■ docker-compose.yml

version: '3'

services:
    php:
    container_name: php8.1-test2
    build: .
    ports:
        - 8080:8000
    volumes:
        - ./src:/work/php/test2

最近はWeb関連の仕事が多く、CSSやらJSも勉強中です。
PHPは一切触ったことないのでまずはイマドキな感じの環境周りのメモでした。
次はPHPのフレームワークLaravelあたりの記事でも書こうかと思います。

8. 参考

以上、もりもりでした。